


Essential Tips for Tattoo Aftercare Success
Congratulations on your new artwork! You’ve just invested in a piece of art that will last a lifetime, and it’s normal to wonder, “Now what?” Healing your tattoo perfectly is simpler than you think. A great tattoo isn’t finished when you leave the artist’s chair—it’s finished when it’s fully healed. The next few weeks are critical for locking in the sharp lines and bright colors you paid for, and a consistent routine is the key to success. This guide provides a clear, step-by-step plan to protect your investment. We’ll cover everything from the initial wrap and the daily wash-and-moisturize cycle to navigating the “ugly but normal” peeling phase. You’ll gain the confidence to turn your fresh ink into a beautiful, vibrant piece of art that you can be proud of for years to come.
The First 24 Hours: What to Do Immediately After Leaving the Studio
As you leave the studio, your tattoo will be covered, and this initial wrap is your first line of defense. Think of it as a temporary shield, protecting your fresh tattoo—which is essentially an open wound—from airborne bacteria and friction against your clothes. Following the correct new tattoo care instructions for this first step is crucial for a smooth healing process.
The most important question is how long to keep a tattoo wrapped, and the answer depends entirely on what your artist used. They will give you specific advice, but it generally falls into one of two categories:
-
Plastic Wrap: Remove this after 2-4 hours maximum. This wrap is only meant to get you home cleanly. It doesn’t breathe and can trap moisture, so you want it off promptly.
-
Adhesive Bandage (e.g., Saniderm): Leave this on for 3-5 days. These breathable, medical-grade wraps are designed for extended wear. Don’t be alarmed if you see fluid (a mix of plasma, blood, and ink) building up underneath—this “ink sack” is totally normal and part of the healing process.
Once the time is up, your next step is to carefully remove the wrap and give your tattoo its first wash.
How to Wash Your New Tattoo for the First Time (Without Damaging It)
Taking that first wash can feel a little daunting, but the process is simple. The goal is just to gently clean away any dried plasma, excess ink, and bacteria without being too rough. Think of it less like scrubbing a dish and more like rinsing a delicate fruit. Keeping it clean is essential for avoiding infection and ensuring a vibrant heal.
When you’re ready for that first wash, or for showering with a new tattoo, just follow these five simple steps. Your tattoo is an open wound, so always start by washing your hands first.
-
Wash Your Hands: Use warm water and soap to clean your hands thoroughly.
-
Use Lukewarm Water: Splash the tattooed area with lukewarm water, as hot water can cause irritation and open your pores too much.
-
Lather Gently: Dispense a small amount of soap into your palm and lather it up. Using only your fingertips, gently apply the foam to your tattoo in a circular motion. Do not use a washcloth or loofah.
-
Rinse Completely: Let the lukewarm water run over the tattoo until all the soap is gone.
-
Pat Dry: Gently pat the area dry with a clean, disposable paper towel.
The key to a safe wash is choosing the right soap. You need a gentle, fragrance-free, liquid antibacterial soap. Harsh chemicals and fragrances found in scented body washes or bar soaps can seriously irritate your healing skin. Look for classics like Dial Gold or a basic cleanser like Cetaphil—they’re perfect and easy to find.
Finally, how you dry your tattoo is just as important as how you wash it. Avoid your regular bath towel at all costs. Even if clean, cloth towels can have a rough texture that snags on flaking skin and, more importantly, they can harbor bacteria. A fresh paper towel is the single best way to pat your tattoo dry without introducing germs or causing damage. Once it’s completely dry, you’re ready for the next step.
The Ointment vs. Lotion Debate: What to Use and When
Once your tattoo is clean and completely dry, it’s time to moisturize. For the first two to three days, your tattoo is an open wound that needs a protective barrier against bacteria. This is where an ointment comes in. A thin layer of a product like Aquaphor or A&D creates a breathable shield that protects the vulnerable skin while still allowing it to get the oxygen it needs to heal. Think of it less as a moisturizer and more as a temporary, flexible bandage for the initial wound-healing stage.
Around day three or four, you’ll notice a change as your tattoo begins to close up and enter its peeling and flaking stage. Now its needs are different. It no longer requires a heavy barrier; it needs hydration to soothe the dryness and itchiness. This is the perfect time to switch to a gentle, fragrance-free lotion. Heavy ointments are no longer necessary and can actually hinder this new phase of healing. The best lotion for a new tattoo is a simple, unscented one that absorbs well, keeping the skin soft and comfortable.
Whether you’re using ointment or lotion, the most important rule is that less is more. You only need a very thin layer—just enough to make the tattoo look shiny, not greasy or goopy. Applying too much can suffocate your skin, trapping moisture and bacteria, which can lead to clogged pores and healing complications. If your tattoo looks wet after you’ve applied product, you’ve used too much. A pea-sized amount is often plenty, so gently dab off any excess with a clean paper towel to avoid over-moisturizing.
Your Day-by-Day Healing Timeline: What to Expect in Weeks 1 & 2
The tattoo healing process isn’t always pretty, and it’s normal for your fresh ink to change from day to day. Understanding what’s coming will help you relax and trust the process. Think of it as a predictable journey with a few distinct stages, each one a sign that your body is doing its job correctly.
Your tattoo’s healing journey will generally follow this timeline:
-
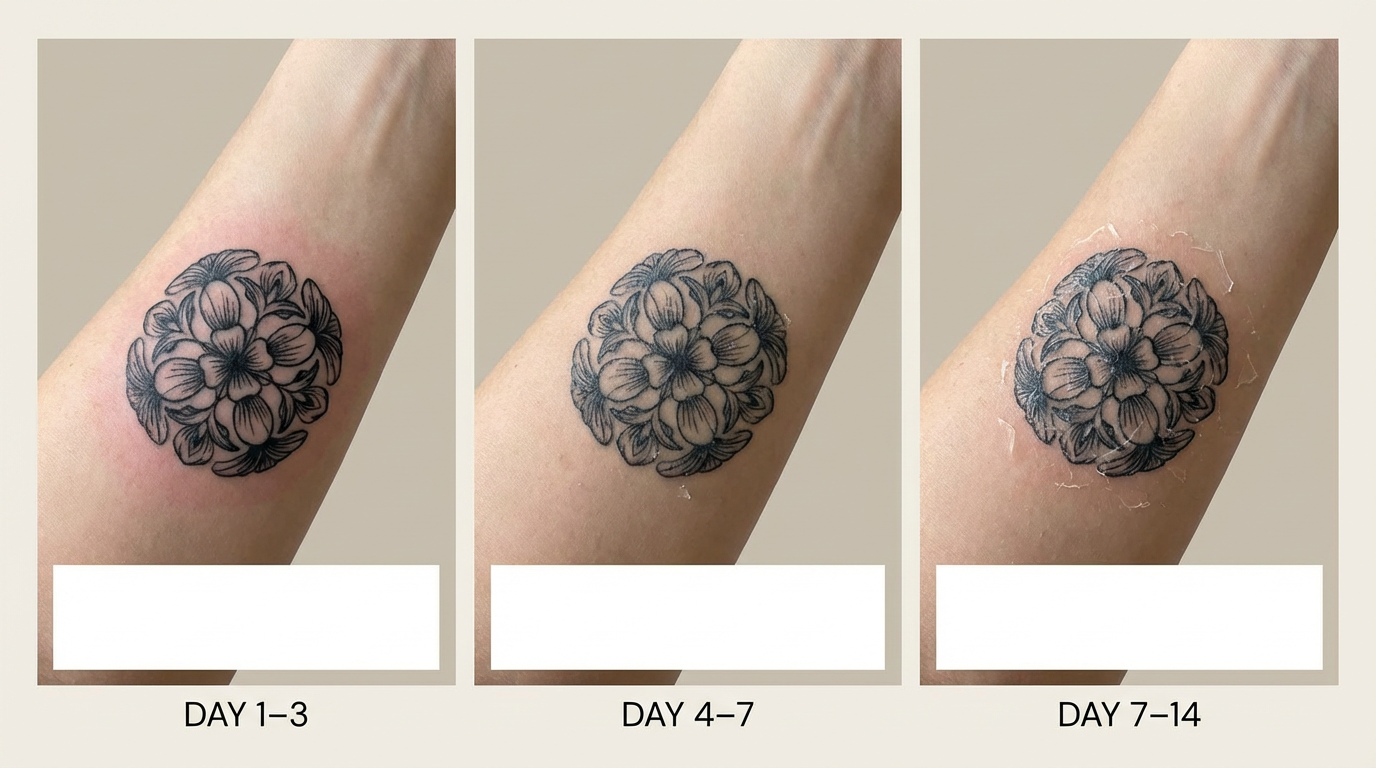
Days 1-3 (The Open Wound Phase): Expect some redness, minor swelling, and a bit of oozing. This “weeping” is a mix of clear plasma and excess ink, and it’s a perfectly normal part of your skin’s initial response. Keep following your washing and ointment routine.
-
Days 4-7 (The Itchy & Flaky Phase): The initial swelling will subside, and the tattoo will start to feel tight and intensely itchy as thin scabs form. Flaking will begin. This is when you’ll switch from ointment to lotion to keep the area hydrated.
-
Days 7-14 (The Peeling Phase): Now for the strangest part. Your tattoo will likely start peeling heavily, much like a sunburn. Resist the urge to help it along! Do not pick, peel, or scratch the flakes, no matter how tempting it is.
Remember, the flakes and scabs are just the dead top layer of your skin. Your actual tattoo ink is safely locked into the layer below. Picking at the scabs can pull this ink out before it’s settled, leading to patchy spots and potential scarring.
Believe it or not, that maddening itch is the best sign that your skin is actively regenerating. If the itchiness is driving you crazy, try gently patting or tapping the area instead of scratching. A thin layer of lotion can also provide significant relief. While all of this is part of the normal healing process, you should also recognize the signs of a potential problem.
Is It Infected or Just Irritated? 4 Clear Signs You Need to See a Doctor
A new tattoo is an open wound, so some redness, sensitivity, and swelling are completely normal for the first few days. But it’s important to distinguish this standard irritation from the warning signs of an infected tattoo. While normal redness stays close to the tattoo and fades, an infection gets progressively worse, not better.
An actual infection goes far beyond typical healing symptoms. It requires prompt medical attention. Look for these four clear signs that something is wrong:
-
Spreading Redness: The redness around the tattoo expands each day or you see red streaks moving away from the area.
-
Excessive Swelling: The tattoo remains puffy, raised, and painful after the first 2-3 days.
-
Pus or Foul Odor: You see thick, cloudy, yellow, or green discharge. This is very different from the thin, clear, or inky plasma that oozes on day one.
-
Fever or Feeling Unwell: If you feel sick, have a fever, or experience chills, your body may be fighting a larger infection.
If you experience any of these symptoms, do not try to “tough it out.” Contact your artist to let them know, but your immediate priority should be to see a doctor. While infections are rare with proper care, knowing what to avoid is your best defense against these healing tattoo problems.
The “Do Not” List: 7 Critical Things to Avoid for a Perfect Heal
Beyond knowing the signs of infection, actively avoiding its causes is the best way to ensure a problem-free heal. Your tattoo artist gave you aftercare instructions for a reason—they are the blueprint for a perfect outcome. While every artist has a slightly different method, there are universal rules. Sticking to this list of things to avoid after getting a tattoo is the single best way to protect your new art.
For the first two to three weeks, treat your tattoo like the delicate wound it is. That means you must avoid:
-
Direct Sunlight: UV rays are notorious for fading new ink before it can even settle.
-
Soaking in Water: This includes baths, pools, hot tubs, and oceans, which can harbor bacteria. You cannot swim after getting a tattoo for at least 3 weeks, or until it’s fully peeled.
-
Scratching or Picking: Peeling is normal, but pulling at scabs can lift the ink out and cause scarring.
-
Tight Clothing: Fabric constantly rubbing against your tattoo will irritate it, chafe the skin, and trap moisture.
-
Heavy Workouts: Excessive sweat can irritate the sensitive area and create a moist environment where bacteria thrive.
-
Scented Lotions or Petroleum Jelly: Heavy products like Vaseline clog pores, while fragrances can cause a reaction.
-
Letting Anyone Touch It: Keep your friends’ admiring (and unwashed) hands away to prevent infection.
Don’t worry, showering with a new tattoo is perfectly fine and a necessary part of keeping it clean. Just keep showers brief and avoid letting the spray beat down directly on the fresh ink. After these crucial first few weeks of careful protection, the focus shifts from healing to preservation.
Beyond the Peel: How to Keep Your Tattoo Vibrant for a Lifetime
Following the core mantra—keep it clean, keep it moisturized, and let it breathe—sets your new artwork up for a brilliant, successful heal. Once the peeling stops, however, the work shifts from healing to preservation. Your tattoo’s single greatest enemy over its lifetime is the sun. Its UV rays are experts at breaking down ink particles, turning crisp lines blurry and vibrant colors dull.
To keep your tattoo from fading, the most effective plan is also the simplest: make applying a high-SPF tattoo sunscreen a non-negotiable habit before you head outside. This one action is the final, lifelong step in your aftercare routine, ensuring the art you invested in remains vibrant forever.